
Tools Required for the Training Tool Box
The tool list below is based on the tool list supplied by Van’s Aircraft for their Training Tool Box project. The Basic tool kit assumes that an instructor will provide all of the tools in list 3 to allow completion of the tool box. List 4 provides some lower priced alternatives to list 3. While the items in list 4 appear to offer a saving please bear in mind that quality of the tool, ease of use, longevity or quality of the finished part will suffer with the cheaper tools.
If you are considering attending the LAA sheet metal work course you should buy the Basic Tool Kit. If you would like to own all of the tools required for the Training tool box then the tools in List 1 & list 3 would be appropriate. These tools would also provide a very good basis for a kit to build any metal aircraft.
Gloster Air Parts is able to supply all of the tools in these lists, please contact Diana Pengilly on 01252 617484 or sales@glosterairparts.co.uk. The prices listed below are correct as of September 2008.
Below the tool lists are some thoughts on metal working tools from Diana’s husband, Peter, based on the Van’s tool requirements for their kits. Peter started out his working life as an apprentice at Hawker’s in Kingston just after it became British Aerospace, so has a very good understanding of metal aircraft structures. He now flies an RV-6 and is in the process of building an RV-7.
| Basic Tool Kit |
| Item |
| Safety Glasses |
| Steel Rule 6” or 12” (or both) |
| Ultra Fine Marking Pen |
| #40 Drill Bits (for 3/32″ rivets) (4 drills per pack) |
| #30 Drill Bits (for 1/8″ rivets) (3 drills per pack) |
| 3 Colour Marking Pens |
| Training Tool Box Tool Kit |
| Item |
| 3X Rivet Gun |
| 1 ¼ “ Dia. Flush Set with rubber guard |
| 1/8″ Cupped Set 3.5″ |
| Flat Set 1/2″ x 1/8″ |
| Back Rivet Set |
| 1″ Dia. Flush Set (no guard) |
| Mini Bucking Bar 1 lb. |
| Bucking Bar 1.75 lb. |
| Microstop Countersink Unit w needle bearings |
| #40 Countersink – 3/32″ Rivet |
| 3/32″ Rivet Dimple Die |
| Deburr Tool |
| Cleco Pliers |
| Pop Rivet Tool |
| Snips x 3 Left, Right & Straight |
| 30 Cleco Fastners – 3/32″ |
| 10 Cleco Fastners – 1/8″ |
| Snips Left & Straight |
| Snips Right & Straight |
Van’s Tool List
The list below is the recommended tool list published by Van’s for all their aircraft except the RV-12 with additional option tools. There are also further details in the construction manual.
I have included my views on what is required and why, with a slant to what is available on this side of the Atlantic, and with British names where appropriate. I have also included the tools that Van’s does not mention (like an air compressor) and other that will make your life easier. There is often more than one way of doing most things, this is just one man’s opinion …
Riveting
3X Rivet Gun with E-Z Change Spring
Rivet sets: 1″ Dia. Flush Set, 3/32″ Cupped Set 3.5″, 1/8″ Cupped Set 3.5″, Double Offset Cupped Set (1/8” rivet)
Bucking bars: Mini Bucking Bar 1 lb., Anvil Bucking Bar 1.9 lb., Footed Bucking Bar 2.2 lb.
Pop Rivet Tool
Hand Squeezer with 3″ Yoke
Squeezer Sets: 1/8″ & 3/16” Universal Cupped Set, 1/2″ x 1/8″ Flat Set (2 required) & 3/8″ x 1/8″ Flat Set
Rivet Cutter
C-Frame Riveting Tool
Optional: Back Rivet Set, Removable Rivet Tape, 12 oz. Dead Blow Hammer
Drilling
Air Drill
Drill Bits: #40, #30, #19, #12, 12″x#40, and 12″x#30
Unibit 1/4″ – 3/4″ by 1/16 ths
Optional: Drill Stop Set of 4, Angle Drill Attachment with threaded Drill Set 6 pc
Deburring
Deburr Tool
3M Cut & Polishing Wheel 6″
Deburring Set – Large Holes
Edge Deburring Bit
Optional: Cordless Drill/Screwdriver (for deburring)
Countersinking:
Microstop Countersink Unit with #40, #30, #10 & #8 Countersinks
3/32″ Rivet Dimple Die
1/8″ Rivet Dimple Die
#8 ScrewDimple Die
Optional: #6 Countersink, Dimple Die Organizer
Cutting
Snips Left, Right & Straight
10″ Vixen File
File Card / Brush
Temporary fasteners
Cleco Pliers
4 Cleco Clamps -1/2″ Jaws
4 Cleco Clamps -1″ Jaws
325 Cleco Fasteners – 3/32″
175 Cleco Fasteners – 1/8″
Safety Items
Safety Glasses
Hearing Protector
Other Tools
2 Screwdriver Bits – Size #2
24″ Stainless Rule
Permanent Markers (“Sharpie” Ulta Fine Point)
Fluting Pliers
Air Tool Oil
Tape Dispenser
My firm belief is that it is worth biting the bullet and buying good quality tools before you start building. Poor quality tools only mean you will have to buy them twice after the first one has broken! Spend the extra few pounds in the first place. It can be an expensive exercise, but, with care most tools should last many years.
I’m going to start with the one essential item that Van’s missed off
Air Compressor Van’s recommend a 75 psi 4-5 cfm (cubic feet per minute) compressor with a small tank. In this country it is difficult to get anything below 115 psi. The key here is the number of cfm at what pressure? Most air tools work at 90 psi, so that is the minimum pressure compressor should deliver and is the pressure that the cfm rating should be given. Let’s take Van’s 4cfm at 90 psi as a minimum. More than 10 or 11 is probably overkill for homebuilding. The other issues are tank size and max pressure. If you buy a large tank (say more than 50 litres) and a high pressure (say 150 psi or more), your effective cfm is much larger as the tank can sustain your 90psi working pressure for some time. Therefore the compressor can be of a lower rating as long as you don’t want to work continuously.
Horsepower ratings can be misleading. Tank size is often not critical, but more is usually better – 25 litres is probably a minimum. Maximum pressure is also not critical, 115psi is probably the minimum, and again more is usually better. Take a look at your most thirsty air tool, usually your drill. A good quality high speed drill will consume up to 14 cfm when running continuously. A 9-10 cfm compressor with 50-100 litre tank will be able to keep such a drill going at top speed during an intense period of hole drilling. It is rather frustrating to have to stop work every few minutes to wait for your compressor to catch up. If you plan on painting your aeroplane yourself then your spray gun may be the limiting factor – your finish quality will be compromised if you have to stop spraying and wait for the compressor.
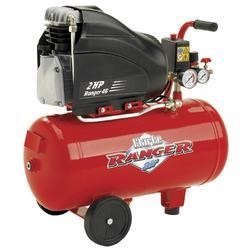
The other factor to consider is the noise the compressor makes. Direct drive (or oil less) compressors run much more quickly, and are much noisier than, belt drive examples – but they are cheaper. Most people have to put their compressor in their workshop, you might think you can with stand the din, but direct drive compressors are very noisy and it will become very wearing at the end of a day’s drilling. The final factor is vertical or horizontal. If you have the space to hide away a horizontal version then that is perhaps better, a vertical takes up less floor space.
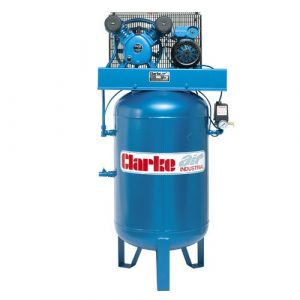
So what kind of compressor would I buy? Since I have had an air compressor I have found it very useful; I also now buy pneumatic tools when I can as they are generally much lighter than electric versions. I would suggest 2 types:
| If you think you will use air tools after building your aeroplane I would go for a belt driven example such as the horizontal version opposite or below. If you don’t expect much use after your project I would probably settle for a direct drive version (although I would construct a sound proofing enclose around it, with ventilation), such as the below right. I can’t tell if it meets the cfm rating above, but it’s probably the minimum you could get away with at 2hp. | 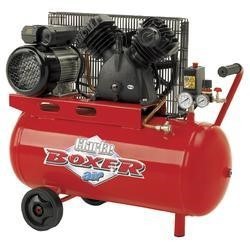 |
 |
 |
Do not forget the fittings and hose you will require. A “Y” piece is often useful so you can run a drill and rivet gun at the same time. Bear in mind that US and British pipe threads are different, as are US and British quick release couplings. Order US couplings if buying US tools with a hose adaptor and use a length of hose to convert. Air connectors is another topic entirely!!
There are a few other power tools that will make your life much easier, such as a band saw, belt sander and pillar drill (drill press to the Yanks). Here’s a quick description of each.
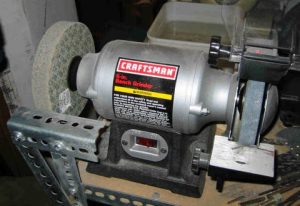
| Once I got a band saw I was amazed how I ever managed without one! Mine is not very powerful and usually has a fine blade (24 tpi) but I use it all the time. I also have a wood cutting blade if I am cutting thick pieces of wood – the fine blade does work but takes ages. | 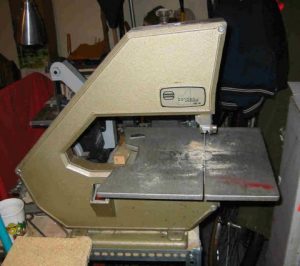 |
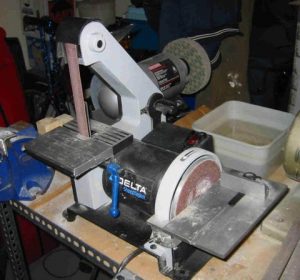 |
The finish from the band saw is quite rough so a belt sander is very useful to smooth down the lumps. It is also useful for edge finishing sheared sheets. |
|
A bench grinder is essential to mount your Scotch Brite Wheel. To enable access with the larger parts the guard must be removed – so take care!! I fabricate a tool rest for the smaller parts (but they get hot quickly). |
 |
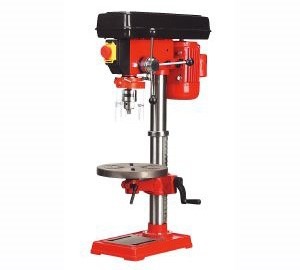 |
Another useful but not essential item. The pillar drill (drill press in the US) opposite has 12 speeds running from 210 to 2580 rpm. Low speed is essential if you intend to use a fly cutter (circle cutter). Decide on your budget and see what you can get, the really cheap drill might not actually drill straight. Ensure the table is at right angles to the chuck before drilling anything important! A sturdy table vice to hold the work is also useful. |
Now to go back to Van’s list
Safety Items
I know its boring to start with safety items, but of these tools do have the potential to do major damage to you or your building colleagues. A good pair of Safety Glasses is essential to help prevent drill swarf and other debris from getting in your eyes. Riveting is loud, so a pair of Ear Duffs (Hearing Protectors) are strongly recommended. You will cut your hands while building, many people find it impractical to wear gloves all the time but consider leather work gloves when the risk is highest. Any time you handle paint or resin use rubber gloves and safety glasses and a respirator. If you intend to spay paint then consider the use of a forced air breathing system, such as Hobby-Air, rather than a respirator. Modern paints can penetrate respirators after a while, you only get one pair of lungs. If you do use a respirator then change the filter regularly. This is not a comprehensive review of the safety hazards, please take some training is you are unsure.
Rivet Gun At least a 2X gun will be required, I prefer a 3X. An automotive air chisel is not suitable as it does not have a feathering trigger essential for successful riveting. The size of gun is very much up to personal preference. Some builders opt for a 4X gun which has a slower striking rate than a 2X or 3X gun but delivers more power per stroke thus setting the rivet with fewer hits with less chance of shearing the head. On the other hand it is easier to over set a rivet with the larger gun which is also heavier in the hand. It is possible to convert a 2X to a 3X, but the rivet gun must be returned to the US – I would start with a 3X. Try to have a go before buying. There is no way to build an RV without a rivet gun! An E-Z change spring is used with a flush riveting set. I would not bother with an air swivel regulator as I don’t think they work very well. I use a pressure regulator bolted to the wall and turn the air supply to my gun down to 45 psi for 3/32” rivets and 55 to 60 psi for 1/8” rivets. I find it much easier to do this than use a fiddly regulator on the gun which is difficult to set to a specific pressure.
Rivet Sets Or Snaps or Dollies, different words for the same things. 3/32” & 1/8” cupped sets are required plus a flush set. A double offset 1/8” set is needed occasionally. There are several styles of flush set with different diameters and with and without guards. The guards stop the set skidding sideways during riveting (and then denting the work). There are many flush rivets in an RV so I would recommend a guarded version (the rubber guard can always be removed). There are also different diameter flush sets, I tend to use the larger ones. A flush set with a swivel is available that means the gun does not have to be completely perpendicular to the work to avoid dents. Although a Back Riveting Set is listed as optional it isn’t really. It is designed to allow the gun to be used on the rivet tail and so producing a much better external finish, especially on items like control surfaces. I would strongly recommend one of these for the empennage (along with a back riveting plate). If you will be making your own spar a 3/16” set is also required. The shape of British rivet heads is different to that of American rivets thus US snaps will have to be bought.
Bucking Bars Or Reaction Bars or Dollies (or just bars). Any piece of suitably polished steel can be used as a bar as long as it is heavy enough for the gun. A piece of plate 1/2 to 3/4″ thick and around 18″x 4″ is useful for back riveting (look for “[Sheffield] Gauge Plate” on the internet). Tungsten is the best material for a bar. It absorbs the vibration better than steel and is very dense – so smaller and easier to hang on to than a steel bar – but it is expensive, perhaps 3 or 4 times the price of a steel bar. You will require several steel bars, but I have only one tungsten bar. For steel bars a small, light (say 1lb), bar for riveting skins on in awkward places, a 1 ½ to 2lb bar for 1/8 rivets and perhaps a larger one to clamp in the vice. Don’t be afraid to cut up suitable bits of steel to get into odd corners.
Pop Riveter Not much to say here, a pair of pop rivet pliers is needed. For an RV a pneumatic pop rivet tool is a bit of over-kill, but for a Sonex or Zenith it is just about essential (or for an RV-12).
Rivet Squeezer It is possible to use a rivet gun and bar to set just about all the rivets on the aircraft, whereas a squeezer will only reach those near to an edge. However, many people prefer using a squeezer at the edge of the skins as it is easier to control. A pneumatic squeezer is expensive but is a very able tool and a fast worker – most people who get one wonder how they managed without it. A hydraulic squeezer (Numatix) is lighter, easier to use, and more expensive still. A hand squeezer is also not cheap but is easier to handle than a gun and means that you do not have to start up your compressor to set a handful of rivets. Beware, hand squeezing an 1/8″ rivet requires a lot of squeeze with a normal squeezer (and often results in sheared rivets). Newer Avery squeezers & the Cleaveland “Main Squeeze” have slightly longer handles making 1/8″ rivet squeezing much easier. All squeezers (except for the very cheapest) have 2 parts, a pair of handles and a yoke. The yoke is interchangeable depending on what is being squeezed. If you think you might ever buy a pneumatic squeezer then get a hand squeezer that takes standard yokes that will also fit the pneumatic squeezer. Yokes are expensive and you don’t want to have to buy 2 sets. You will probably end up with a 3” yoke for general work, a longeron yoke for more clearance and a 2” no hole yoke to get into tight places (like tips of control surfaces).
Squeezer Sets Sets are required for a squeezer to allow it to squeeze the different types of rivet. As with rivet guns there are cupped sets and flush sets. Most sets are ½” diameter, but sometimes a 3/8” diameter set is needed to get into tight spots. A flush set is always used for the tail of the rivet, and for both sides of a countersunk rivet. Flush sets are available in a range of lengths to cater for different rivet lengths and to allow the best mechanical advantage to be obtained form the squeezer.
Rivet Cutter Used to shorten rivets, a pair of side cutters can be used, but a purpose made tool will allow exact lengths to be obtained with a straight cut – which will make setting the rivet much easier.
C-Frame Riveting Tool This is one which is pretty much essential with all the skins to dimple. It is one of those items for which you are always finding new uses. Talk to someone who has got one to find out how useful it is. There is an alternative (called an DRDT2) but it is very heavy and consequently very expensive to ship from the US, and it is twice the price of a C-Frame arm in the first place (and may not make such sharp dimples). The C-Frame tool has been developed over several years to meet the needs of RV builders. A nylon or polyethylene mallet is also required – my view is that a dead blow hammer is not required, is too heavy, and makes this tool difficult to use.
Back riveting As mentioned above back riveting produces a much better finish. A steel plate is required on your bench to rivet on to (a marble slab can also be used) and tape is needed to hold the countersunk rivets in their holes. If ordinary sticky tape is used it will cut around the rivet heads and be very difficult to remove. The secret is to use 3M “Magic Tape”, more expensive “Riveting tape” is also available but not really required.
Air Drill With 12,000 rivets to drive, at least 24,000 holes are going to be drilled, I believe an air drill is a must. You can get away with a rechargeable electric drill for a while but will eventually switch to a windy drill. Buy the best you can afford, eccentric holes are a quick way to ruin parts. A speed of around 2500 rpm is desirable, more (up to 4000rpm) is better, a “feathering” trigger is essential – one that speeds up the drill as it is squeezed more. Desoutter are a good UK brand, but very expensive. Sioux were one of the best US brands, but have recently signed a deal with a large American distributor that has seen their prices to everyone else go up. Nova brand from Pan American Tool is a good option. Beware cheap drills, particularly on ebay and especially cheap 2nd hand drills on ebay. One useful addition to a drill is a good quality key less chuck, although air drills some times stop so quickly that a key less chuck can undo itself!
Right Angled Drill Not essential, but makes your life so much easier! If you are not expert at using a 12″ long drill bit an angled drill will make all the difference. You will be able to get into all those awkward corners with ease. The best type to get is one which uses collets to hold the drills; the bits can be used full length or broken off and a stub used. The collets grip on the shank or flutes of a bit. Desoutter make these drills in this country but the price will make your eyes water (although they are occasionally available from ex-MoD sources in reasonable condition). American versions use special drill bits with a thread cut on their shank, thus only a few drill sizes are available. The most cost effective version is an extension type that mounts in the chuck of your normal drill and uses the threaded bits.
Drill Bits Van’s lists all the sizes required. Number drills are also known as Morse drills on this side of the Atlantic (ie a #40 = Morse 40) but can be difficult to get hold of, although good tool shops usually stock them. Metric equivalents are #40 = 2.50mm, #30 = 3.25mm (3.30 mm may be used), #21= 4.10mm, #12= 4.80 mm (4.90 mm may be used) and Letter F = 6.50 mm. It is worth considering buying cobalt bits as they last longer than ones made from High Speed Steel. Unibits and 12″ long bits are very useful.
Drill stops These devices attach to drill bits so that the depth to drill to can be set, they have a spring so that there is a little ‘bounce’ as the drill goes through. Different sizes are required for each of the common drill sizes, although they can be drilled out is needed.
Deburring Tool Every hole must be deburred on both sides, so that is at least 4 deburrings per rivet. It does become really tedious, but is essential if your aeroplane is to last. A good deburring tool is essential. Some people prefer to put the deburring cutter into an electric screw driver, I prefer the hand powered version. The cutter is 3/8” diameter so for larger holes a different tool is required, such as a ‘multi-burr’ tool – it comes with several blades. For deburring the edges of sheets a fine file can be used or a double edge deburring tool. A 6” steel rule is also useful here as well!
3M Cut & Polishing Wheel 6” (aka Scotchbrite Wheel) This is sometimes referred to as a unitised wheel and is made from compressed scotchbrite. Very useful for “breaking” the edge of sheet metal parts and all sorts of other things. Gives a very smooth burnished edge to parts. Mount in a bench grinder with the wheel guard removed to give better access – but be careful! These wheels are also available in 1” and 2” diameter versions to fit into a die grinder for getting into tight corners.
Microstop Countersink Cutter While any 100° counter sinker will do it is very difficult to get a good repeatable finish (that is rivets exactly flush with the skin) without a microstop countersinker adjustable to one thou (0.001”). Several versions are available, I would use the version with needle bearings. Four different size cutters, #40, #30, #20 (for a #8 screw) and #12 (for a #10 screw) are required. A kit is available with these items in. Special angle cutters (82° and 120° cutter are also available) along with a rivet shaver bit (to mill rivets down flush).
Dimple Dies In thin sheet, as used for RV skins, there is insufficient material to countersink so the skins and underlying structure must be dimpled to allow the countersunk rivets to be used. The dimple dies need to dimple to more than 100° as the metal will spring back a few degrees – hence ‘spring-back dimple dies’. If exactly 100° dies are used the rivets will not sit flush. Three pairs of dies are requires, #40 (3/32”), #30 (1/8”) and #8. Please don’t use cheap dimple dies, it is really noticeable when looking at skins that have been dimpled with cheap dies. The dies are mounted in a dimpling arm, a squeezer or in a special rivet set & block (which is difficult to use well) for dimpling. A small diameter female die is available for tight spaces and a pair of dies mounted in a mole grip (US = vise grip) is available to dimple the tips of control surfaces. Also ‘pop-rivet’ dimplers are available that are thin dimple dies drilled out to take a nail that mount on a pop rivet plier for dimpling hard to reach places.
Tin Snips Left cutting and right cutting required, straight cutting useful. Coloured handles identify which way snips cut, red = left, green = right, yellow = straight. As with everything there are cheap and expensive snips, you get what you pay for with the more expensive versions giving a better cut, are easier to use and last longer. I like the large, aluminium handled, snips.
Files Van’s recommends a 10” Vixen file only, but my view is that a few more files are always useful. Three or four will do to start with, a small rat’s tail, an 8″ 1st cut half round, a 10″ flat bastard and a 6″ flat 2nd cut. Buy good quality, not pre-packed in a DIY store. Don’t forget the handles. A file card will stop them from clogging. Add more as you progress with your project.
Cleco Fasteners Treat Van’s recommendation as a minimum. Don’t be tempted to save money on clecos as cheap versions will be difficult to insert and will make small ring around all your holes. Short body and long reach clecos are available if required. If you are concerned about the clecos scratching your skins ‘cleco boots’ are available that fit over the end. Do not forget to get a pair of cleco pliers, or two or three. As you will be inserting clecos all the time many people find that a pneumatic cleco tool is very useful.
Cleco Clamps These are spring loaded clamps that are operated by cleco pliers and are great for temporarily holding things together. Once you have a few you may just end up buying more and more! Four sizes are available, ½” and 1” reach jaws with either ½” or ¾” maximum gap.
C Clamps A few clamps of various sizes always come in useful, from the 1″-2″ size up to 6”.
Fluting Pliers These put a small crimp in a piece of metal. A pair with polished metal jaws producing a thin flute give the best results, there 2 versions a mole grip (vise grip) and normal plier.
Steel rule Essential to have a steel rule, many uses other than measuring! Van’s recommends a 12” rule, a 6” rule is also very useful.
Marking Pens Ultra fine tipped (0.4mm or thinner) permanent ink marking pens have now all but taken over from engineer’s blue as the favoured way to mark out. A thicker pen (say 1mm tip) can be useful at times. Use meths (US = denatured alcohol) to clean off the ink – it will bleed through most primers (which can be used to your advantage at times). An alternative is a 2B (or 4B) pencil, but be aware that you must clean the pencil lead off the aluminium once its job is done as it can promote corrosion.
Air Tool Oil To keep your air tools in good working order it is essential to put a small squirt of oil into the air inlet on a regular (daily) basis.
Tape Dispenser For masking tape.
Now the items that I think Van’s have forgotten, but which you will need.
Hand Seamer A tool for straightening or bending flanges – essential. The items sold for welding are not suitable as their jaws are not parallel when they meet.
Centre punch When ever a hole is drilled that is not pre-punched it’s position must be centre punched before drilling otherwise the drill point will wander all over the work, producing a nasty ‘snail trail’. A punch that it hit with a hammer is available, or an ‘automatic’ centre punch that snaps as you press down on it (well worthwhile).
Die Grinder The number of cutting and polishing tools that fit into an air powered die grinder is incredible, so I rate this as a very useful tool. You will need one to cut the canopy. A cheap version seems adequate unless you will be putting a lot of load on the nose bearing. Don’t be tempted to use one as a drill, it runs too fast and does not have enough torque. Straight and 90° versions are available.
Pin punch When you drill out a rivet you will need a pin punch to punch out the rivet tail. Various diameters are available
Tube drilling jig Drilling accurate hole in the end of tubes (such as control push rods) is difficult as the tube wants to roll away. A tube drill jig is about the only way to do this task with any accuracy.
Boelube Most of the time no lubricant is required when drilling thin aluminium sheet, but sometimes, especially when things are getting hot, some lubrication is really useful. That’s where Boelube comes in – invented by Boeing. It is also useful for sawing. Available in liquid or stick form, I use the small stick.
Sand Paper Scotchbrite is probably the best abrasive for smoothing edges and small scratches. There different grades available. Also available are Scotchbrite surface conditioning pads which will remove fine scratches or light corrosion from the surface of aluminium or steel – used in a drill or die grinder on a supplied pad holder. 2” diameter pads are probably most useful, use different pads for aluminium & steel (a pad used on steel will have small particles of steel embedded in it, if used on aluminium these steel particles will be transferred over and will promote corrosion). Emery cloth can also come in very handy.
Part numbers: Maroon Scotchbrite pad: 7447 Ultrafine Scotchbrite (grey): 7448
Edge Rolling Tool This tool consists of a pair of rollers mounted on a palm sized piece of aluminium. It is used to bend the edge of a skin down by about 5 degrees to avoid the edge sticking up when it is riveted. The amount of bend is easily controlled. Bends are about a quarter inch wide.
Bolt Grip When the time comes to start assembling the parts you have made into something that starts to look like an aeroplane there will be several items that are bolted together but where the bolts are really difficult to insert, particularly control surfaces. A job that took half an hour, and was accompanied by profuse swearing and cursing, will now take a couple of minutes. Essential, holds a 3/16 bolt one end and a ¼ bolt the other.
Washer Wrench Set In the same category as the bolt grip, it is sometimes almost impossible to insert washers into where they are meant to go – until washer wrenches were invented. Also essential, 4 wrenches per set for washers from 5/16” to 7/8” diameter.
Zeus Tables These are engineering data tables which give metric to imperial conversions as well as fraction to decimal conversions to 0.0001″. Also included are details on all types of screw threads used and tables for bend allowances when bending sheet metal plus much, much more. Highly recommended, available from a quality tool shop.
Vernier Calipers A basic engineering tool, now electronic and available for around £30.
Dividers Another basic engineer’s tool. Don’t bother with a draughtsman’s pair – they are not sturdy enough. Very useful for marking out and measuring.
Circle Cutter Sometimes called a Trepanning tool. This is potentially one of the most dangerous tools in this list – it can inflict really terrible injuries if used without care. However if you need to cut holes, especially lightening holesIf you have bought a ready made wing spar and have a recent wing kit with the lightening holes already knocked out of the ribs you may not need one. An Abra file attachment for your hacksaw will often suffice. Circle cutters should only be used in a pillar drill and at the slowest possible speed with the work held very securely. Don’t ever hold the piece you are cutting with your hand, always clamp it down.